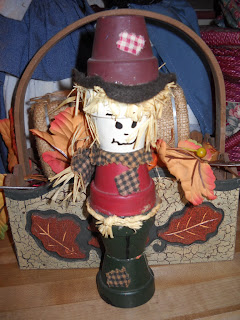
My NEWEST Scarecrow!
I made this scarecrow from clay pots years ago! I should say my kids and I made it when we were homeschooling. Poor thing! I broke his face and hat and then glued them back together - more or less - and drew on 'stitching.' I will never throw it away!
I decided to make another one as practice for the fall craft with the grand kids this year.
You need five clay pots - any size will work - a dowel rod and base.
Paint, markers, raffia, scraps of fabric, silk fall leaves/flowers.....embellish as you wish!
This is a LITTLE one Amber or Ben made a long time ago. They made several and gave as gifts.
Instead of a dowel and base they simply glued the pots to each other. This one has held up very well......minus the missing arm. This scarecrow is just 8 1/2 inches tall.
I used a black marker to draw on shoes and the pant line.
The arms are made fro a tube of scrap pillow tapestry with raffia stuffed inside the openings. I secured it by stitching across the end on the sewing machine. You could hot glue it.
I used a saucer to cut two circles of some stiff black fabric for the collar and the hat brim and then made clips with the pinking shears in the collar. The raffia was sewn on but it could be glued. Don't know which way is more work!
I glued some silk fall leaves around the neck as well as a small one on his leg.
You could also use fabric patches.
I finished it off with a big raffia bow.
He is not standing on the base in this pic......I had to touch up the black paint and was letting it dry!
Now that I have practiced - I have the craft bag all packed and ready to go!
We are spending Sunday with my son and his family......church, lunch, football game, and CRAFTS with the grand kids!! It is a tradition!
This fresh new little scarecrow will sit in my living room for a week or so.
He will belong to my sister who is having a birthday soon.
But, shhhh!!! Don't TELL her!!


Both are cute but the original has extra character!
ReplyDeleteLoved the scarecrow tutorial, a great 'with the kids/grandkids' activity.
ReplyDelete- Joy
That is so cool I want to make one!!! Thanks for showing me how!!!
ReplyDeleteSo cute. I could probably handle making a very tiny one and I'm sure that my grands would like to make one. Nicely done tutorial, too.
ReplyDeleteThese are just so stinkin cute!! Thanks for the instructions!! I HAVE to make one!!
ReplyDeleteXO,
Jane
oh Linda that is just to darn cute..the grandkids are gonna have a ball...
ReplyDeleteoh Linda that is just to darn cute..the grandkids are gonna have a ball...
ReplyDeleteoh Linda that is just to darn cute..the grandkids are gonna have a ball...
ReplyDeleteThat's very sweet! What a cute welcome to a front door.
ReplyDeleteSERIOUSLY- and you called me a crafty lady?
ReplyDeleteThese are the cutest darn things I've ever saw
You have such patience and creativity! Turned out great!
ReplyDeleteThat's so cute! I've seen these around before and wondered what all went into making one. Now I know! I'm sure your sister will really appreciate getting one handmade from you.
ReplyDeletetoo cute!
ReplyDeleteVery cute....and good tutorial.
ReplyDelete